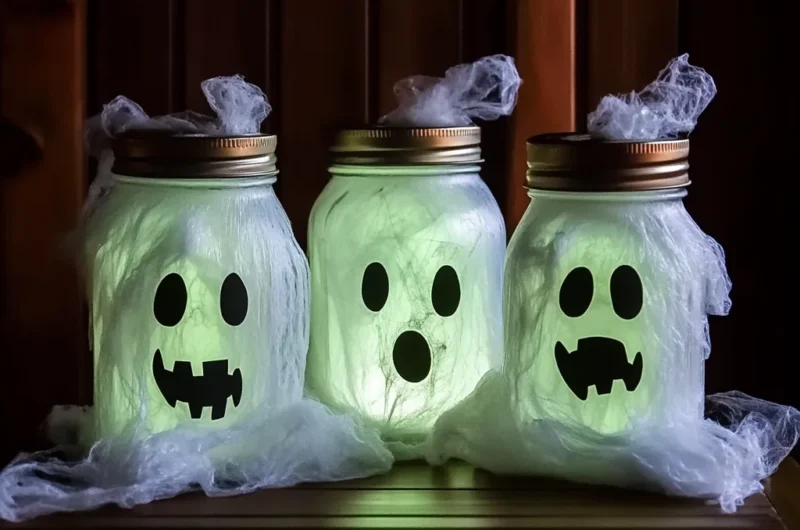
Hey there, my favorite kitchen adventurer! Does anything bring back those warm, fuzzy feelings quite like decorating for Halloween? I remember as a kid, the anticipation of those crisp autumn evenings, the scent of fallen leaves, and the thrill of turning our home into a slightly spooky, totally fun wonderland. And let me tell you, these DIY Glow-in-the-Dark Ghost Jars capture that magic perfectly! They’re not just a craft; they’re a little piece of Halloween joy, glowing softly in the twilight. They remind me of gathering with friends, maybe sipping on a fun Easy Hocus Pocus Punch, and just enjoying the festive spirit.
You’re going to absolutely adore how simple, quick, and utterly charming these ghost jars are to make. In just a few easy steps, you can transform ordinary glass jars into enchanting, glowing specters that will light up your porch, mantel, or even your kiddo’s bedside table. They’re spooky-cute, not scary-scary, making them perfect for all ages.
Why You’ll Love DIY Glow-in-the-Dark Ghost Jars
- Fast: You can whip up a batch of these in under an hour (plus drying time!).
- Easy: No advanced crafting skills required, promise! If you can paint and cut, you can make these.
- Giftable: They make the most adorable hostess gifts or party favors for any Halloween gathering.
- Crowd-pleasing: Kids and adults alike will be enchanted by their ghostly glow.
Ingredients
Gather your supplies, and let’s get crafty! Most of these you might already have around the house, or they’re super easy to find at your local craft store or even a dollar store.
- Empty glass jars: Any size works! I love using old spaghetti sauce jars, mason jars, or even pickle jars. Just make sure they’re clean and dry.
- White tissue paper or gauze: This is what gives our ghosts their ethereal, flowing look. Gauze adds a bit more texture, while tissue paper is wonderfully translucent.
- Glow-in-the-dark paint (or glow spray): The star of our show! You can find this in the craft paint aisle. Make sure it’s suitable for glass.
- Foam brush: Perfect for smooth, even application of the glow paint.
- Black construction paper: For those expressive ghosty eyes and mouths!
- Scissors: For cutting out the spooky features.
- Glue or Mod Podge: To adhere everything in place. Mod Podge is great because it also acts as a sealant.
How to Make DIY Glow-in-the-Dark Ghost Jars
Alright, let’s get those hands a little messy and create some magic! You’ll be amazed at how quickly these come together.
- First things first, you’ll want to make sure your glass jars are sparkling clean and completely dry. Any lingering moisture or grease can prevent your paint and glue from sticking properly. I usually give them a good wash with soap and water, then let them air dry upside down on a dish towel.
- Next up, grab your foam brush and your glow-in-the-dark paint. Apply a generous, even coat to the entire exterior of each jar. Don’t be shy here! This is where the magic really starts. You’ll want to let this first coat dry completely – this might take an hour or two, depending on the paint and humidity. For an extra vibrant glow, I always recommend applying 2-3 coats, letting each one dry fully before adding the next. This layering will make your ghosts shine even brighter in the dark!
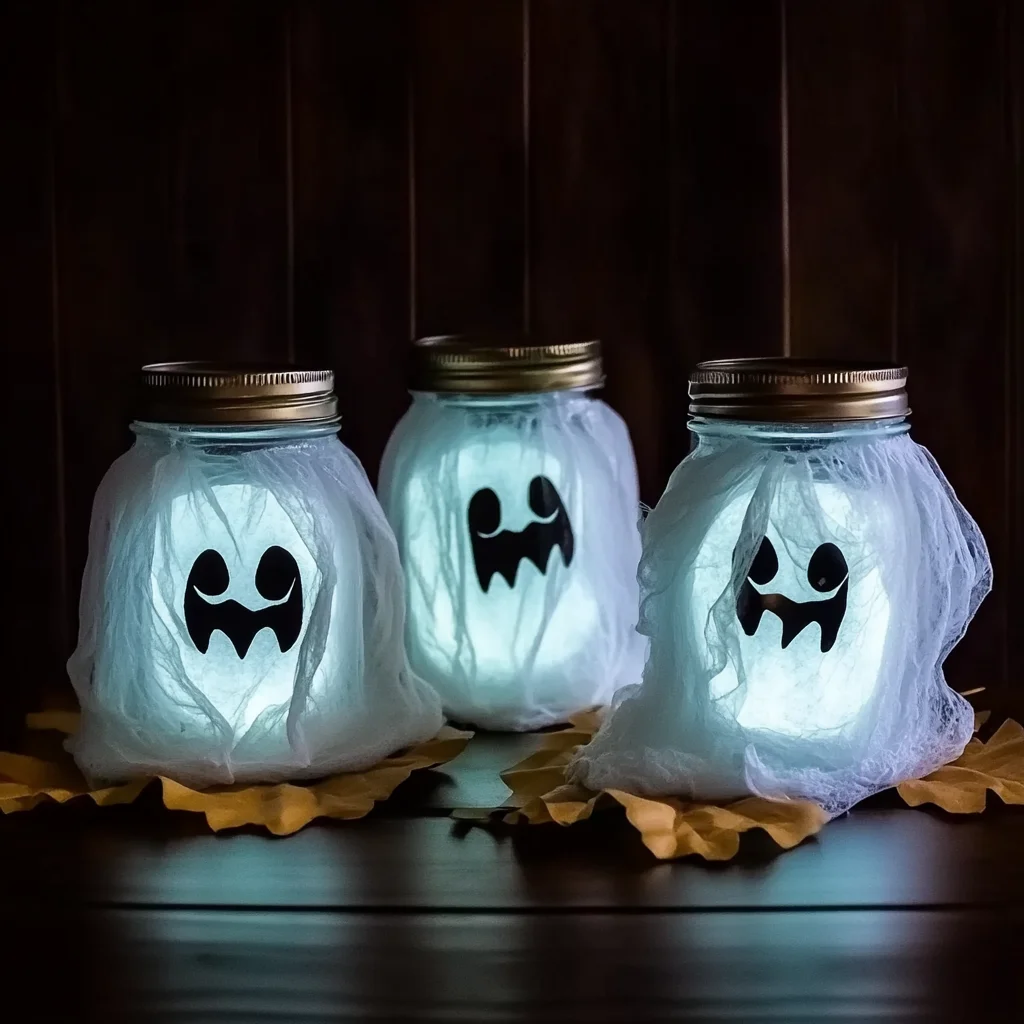
- Once your glow paint is fully dry and charged up, it’s time to give your ghosts their ethereal bodies. Wrap your white tissue paper or gauze around the jar. You can make it as smooth or as rumpled as you like for different ghosty effects. Secure it in place with a dab of glue or Mod Podge. You might need a few small dabs to keep it from slipping. Don’t worry about perfection; ghosts are delightfully imperfect!
- Now for the fun part: giving your ghosts some personality! Take your black construction paper and scissors and cut out various shapes for eyes and mouths. Think spooky ovals, jagged smiles, or even surprised “O” shapes. There are no rules here – let your creativity shine! Once you have your facial features ready, use your glue or Mod Podge to adhere them to the tissue paper on your jar. Place them low, place them high, make them cross-eyed… it’s all part of the charm! If you’re really enjoying this fun jar craft, you might also like trying your hand at some charming DIY Light-Up Scarecrow Mason Jars for another festive autumn project!
- The grand finale! To activate that amazing glow, place your finished ghost jars under a bright light for a few minutes. A sunny window works wonders, or even a bright lamp. The longer they “charge” in the light, the brighter and longer they’ll glow in the dark. Then, the moment of truth: turn off the lights and watch your adorable little specters come to life!
Substitutions & Additions
Feeling creative? Here are a few ways to customize your ghost jars and make them uniquely yours!
- Different Jar Shapes: Experiment with old perfume bottles, jam jars, or even glass milk bottles for a varied ghost family.
- Colored Glow Paint: While white is classic, imagine green or orange glow paint for a truly eerie effect!
- Embellishments: Add tiny bows, googly eyes (instead of paper), or even a little bit of glitter glue to the tissue paper for extra sparkle.
- Fabric Swaps: Instead of tissue paper or gauze, try thin white fabric scraps or even old t-shirt material cut into strips.
- Ribbon & Twine: Tie a festive orange or black ribbon around the neck of the jar for an extra decorative touch.
Tips for Success
Even the simplest crafts can have a few tricks to make them even better. Here are my top tips for glowing success!
- Layer Your Paint: I can’t stress this enough – multiple thin coats of glow paint (with drying time in between) will give you a much brighter and longer-lasting glow than one thick coat.
- Charge, Charge, Charge: For the best effect, give your jars a good, long charge under direct light before you want them to glow. Sunlight is usually the most effective.
- Clean Jars are Key: Make sure those jars are spotless. Any grease or residue can cause the paint and glue to peel or not adhere properly.
- Don’t Rush Drying: Patience is a virtue, especially with paint and glue. Let everything dry completely between steps to avoid smudges or pieces falling off.
How to Store DIY Glow-in-the-Dark Ghost Jars
These little guys are pretty sturdy, and you’ll want to bring them out year after year! To store them, simply find a box or bin where they won’t get squished. You can wrap them individually in tissue paper or newspaper for extra protection if you’re worried about the paper or gauze getting torn. They should last indefinitely as long as they’re stored in a dry, safe place!
FAQs
Got a few questions bubbling up? Let’s tackle them!
- Q: How long do the ghost jars glow?
A: The duration of the glow depends on the quality of your glow paint and how long it was charged. Most will glow noticeably for 15-30 minutes after being in the dark, with a dimmer glow lasting for a few hours. Re-charge them under a bright light whenever you want them to shine again! - Q: Can kids make these?
A: Absolutely! This is a fantastic kid-friendly craft. Just supervise younger children with scissors and glue. They’ll love painting and designing their ghost’s faces! It’s a great activity to do while munching on some spooky treats like Oreo Eyeball Truffles. - Q: What if I can’t find glow-in-the-dark paint?
A: Some craft stores also carry glow-in-the-dark spray paint, which can be even faster to apply. Just be sure to use it in a well-ventilated area and follow the manufacturer’s instructions carefully. - Q: Are these safe to put candles inside?
A: I’d recommend using battery-operated LED tea lights or fairy lights inside these jars rather than real candles. The tissue paper is flammable, and battery lights give a wonderful flicker without any fire risk!
I hope you have the best time making these charming DIY Glow-in-the-Dark Ghost Jars! They’re such a simple way to add a touch of magic and whimsy to your Halloween decor. Happy crafting, friends!
For more delicious recipes and fun DIY ideas, make sure to follow us on Pinterest!