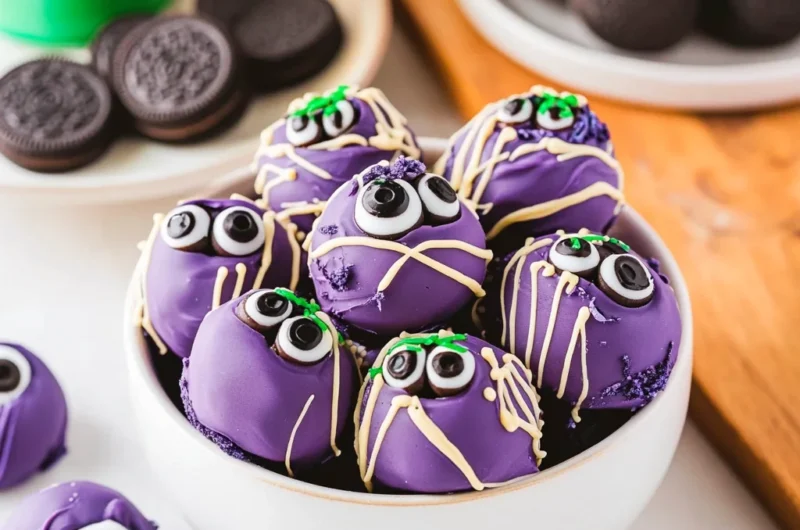
Remember those days leading up to Halloween, buzzing with excitement, thinking about all the spooky treats and candy? Well, I do! And let me tell you, some of my fondest memories involve whipping up something fun and festive in the kitchen. If you’re looking for a recipe that captures that playful, slightly mischievous spirit without requiring hours of work, you’ve hit the jackpot. These Oreo Eyeball Truffles are ridiculously easy, super quick, and so memorable, they’ll become a staple for your Halloween gatherings or just a fun afternoon snack. They bring all the joy of homemade goodness with none of the fuss – truly a treat for the eyes and the taste buds!
Why You’ll Love Oreo Eyeball Truffles
- Fast: From start to finish, you’re looking at minimal active time, making them perfect for busy schedules.
- Easy: No baking required, just simple steps anyone can follow. Seriously, if you can pulse a food processor, you can make these!
- Giftable: Package them up in cute little boxes or bags for friends, teachers, or trick-or-treaters. They make the sweetest, spookiest gifts!
- Crowd-pleasing: Who doesn’t love Oreos and cream cheese? These are a guaranteed hit with kids and adults alike.
Ingredients
Gathering your ingredients for these spooky treats is almost as fun as making them! You only need a few simple things, which I just love.
- 19.1 oz. family-size package golden Oreos: The star of our show! Golden Oreos give these truffles a lovely vanilla base, perfect for all sorts of spooky colors.
- ¾ (8 oz.) package cream cheese, room temperature: Make sure it’s softened! This is key for getting that smooth, dreamy truffle texture that blends beautifully with the Oreo crumbs.
- 12 oz. bag colored candy melts: Pick your favorite Halloween colors! Orange, purple, green, or even classic white – whatever makes your eyeballs pop!
- ½ cup color-matching sprinkles: These add a fun texture and extra pop of color. Don’t be shy with them!
- 24 large candy eyes: These are what truly bring our spooky little treats to life. You can find them in most baking aisles or craft stores.
How to Make Oreo Eyeball Truffles
Ready to get your hands a little dirty? Don’t worry, it’s the fun kind of dirty! Follow these simple steps, and you’ll have a batch of eyeball-icious truffles in no time.
- First things first, let’s get those Oreos ready. Grab your food processor and toss the entire package of golden Oreos in there. Give it a good pulse until they’re finely crumbled. You want them to look like fine sand, no big chunks allowed!
- Next, it’s time to add that wonderfully softened cream cheese. Pop it into the food processor with the Oreo crumbs and pulse again until everything is well combined and a soft, pliable dough forms. If you’ve ever made other no-bake treats like No-Bake Caramel Pretzel Bars, you’ll recognize this easy base!
- Now for the fun part: shaping! Using a 1½ tablespoon cookie scoop, portion out the dough. Then, roll each portion into a smooth, perfect ball between your palms. This recipe is also great if you like making other round treats, like these delicious No-Bake Peanut Butter Cheesecake Balls.
- As you finish each truffle ball, place it onto a large baking sheet that you’ve lined with parchment paper. This keeps them from sticking and makes for easy cleanup.
- Once all your truffles are rolled, pop that baking sheet into the refrigerator. Let them chill for 15-30 minutes, or even up to an hour, to really set. This firming-up stage is crucial for making sure they hold their shape when you dip them.
- Time to get decorating! Grab your colored candy melts and a medium microwave-safe bowl. Heat the candy melts in the microwave for 45 seconds, then give them a good stir.
- Continue heating the candy melts in short bursts – 10 to 20-second intervals – stirring thoroughly after each one, until they are completely smooth and gloriously dippable. Be patient here; overheating can make them seize.
- Working in small batches, take your set truffles from the fridge. Dip each truffle into the melted candy until it’s fully coated. Gently tap off any excess coating – you want a nice, even layer, not a thick glob. Place the dipped truffles back onto a clean sheet of parchment paper.
- Act fast! As soon as you place each dipped truffle down, immediately press one large candy eye onto the front. Then, sprinkle the top generously with your color-matching sprinkles. This is where the magic happens and they truly transform into spooky eyeballs!
- Once all your truffles are dipped and decorated, place them back in the refrigerator for at least another 30 minutes, or until that candy coating has completely hardened. This final chill ensures they’re firm and ready to be enjoyed or shared! If you’re really into creative Oreo desserts, you might also enjoy making No-Bake Oreo Cheesecake Sushi Rolls, which are another fun way to use your favorite cookie.

Substitutions & Additions
The beauty of these truffles is how versatile they are! Don’t be afraid to get creative and make them your own.
- Oreo Flavor: While I love golden Oreos here, feel free to swap them for classic chocolate Oreos for a darker truffle, or even a seasonal flavor like pumpkin spice for an autumn twist.
- Cream Cheese: You could try using mascarpone cheese for an even richer, slightly sweeter flavor, though cream cheese is my go-to!
- Candy Melts: If you can’t find specific colored candy melts, white chocolate melts dyed with oil-based food coloring work wonderfully. Gel food coloring works too, just be careful not to add too much liquid.
- Sprinkles: Go wild! Beyond color-matching sprinkles, try sanding sugar, Halloween-themed sprinkle mixes, or even edible glitter for extra sparkle.
- Flavor Boost: Add a tiny splash of vanilla extract or almond extract (¼ teaspoon) to the cream cheese mixture for an extra layer of flavor.
- Inside Out: Crush some extra Oreos and mix them into the melted candy coating for a cookies-and-cream shell!
Tips for Success
Even though these are super easy, a few little tricks can make them absolutely perfect!
- Room Temperature Cream Cheese is Key: Seriously, don’t skip this. Cold cream cheese won’t blend smoothly with the Oreo crumbs, leading to lumpy truffles.
- Don’t Over-Process: Pulse just until a dough forms. Over-processing can make the mixture too oily.
- Chill Time Matters: Make sure your truffle balls are nice and firm before dipping. This prevents them from falling apart in the warm candy melts.
- Work Quickly with Candy Melts: Candy melts can start to set fairly fast. Work in small batches of truffles, dipping and decorating a few at a time, then reheat the melts if needed.
- Tap Off Excess Coating: A gentle tap against the side of the bowl helps remove excess candy, giving you a smooth, professional-looking finish.
- Prep Ahead: You can make the truffle balls a day or two in advance and store them in an airtight container in the refrigerator before dipping.
How to Store Oreo Eyeball Truffles
Once your spooky creations are complete and fully set, you’ll want to store them properly to keep them fresh and delicious.
Keep your Oreo Eyeball Truffles in an airtight container in the refrigerator. They’ll stay fresh and tasty for up to 1-2 weeks. If you’re making a big batch and want to enjoy them for longer, they can also be frozen! Place them in a single layer on a parchment-lined baking sheet in the freezer until solid, then transfer them to a freezer-safe bag or container for up to 1 month. Thaw in the refrigerator before serving.
FAQs
Got a few questions swirling around your head? Let me clear them up for you!
Q: Can I use different types of Oreos?
A: Absolutely! While golden Oreos give a lovely contrast, feel free to experiment with classic chocolate, peanut butter, or even mint Oreos for a different flavor profile.
Q: My candy melts are too thick. What should I do?
A: If your candy melts are too thick, try adding a tiny bit (½-1 teaspoon) of coconut oil or vegetable shortening. Stir well until it reaches a smooth, dippable consistency. Don’t add water, as it will cause them to seize!
Q: Can I skip the candy eyes?
A: You can, but they really make these truffles “eyeball truffles”! If you can’t find them, you could try drawing small dots with edible food markers or piping tiny dots of contrasting melted candy with a toothpick.
Q: Are these suitable for parties?
A: Oh, absolutely! They are the perfect bite-sized treat for Halloween parties, school events, or any festive gathering where you want a fun, easy, and delicious dessert that gets everyone talking.
I hope you have the best time making these fun, festive Oreo Eyeball Truffles! Happy baking (and no-baking)!
For more delicious and easy recipe ideas, make sure to follow us on Pinterest!
Spooky Sweet Oreo Eyeball Truffles

Ingredients
Equipment
Method
- Step 1: Grab your food processor and toss the entire package of golden Oreos in there. Give it a good pulse until they're finely crumbled, like fine sand.
- Step 2: Add the softened cream cheese to the food processor with the Oreo crumbs and pulse again until everything is well combined and a soft, pliable dough forms.
- Step 3: Using a 1½ tablespoon cookie scoop, portion out the dough. Then, roll each portion into a smooth, perfect ball between your palms. Place each truffle ball onto a large baking sheet lined with parchment paper.
- Step 4: Pop the baking sheet into the refrigerator and let them chill for 15-30 minutes, or even up to an hour, to really set. This firming-up stage is crucial for making sure they hold their shape when you dip them.
- Step 5: Grab your colored candy melts and a medium microwave-safe bowl. Heat the candy melts in the microwave for 45 seconds, then give them a good stir. Continue heating in short bursts (10 to 20-second intervals), stirring thoroughly after each one, until completely smooth and gloriously dippable.
- Step 6: Working in small batches, take your set truffles from the fridge. Dip each truffle into the melted candy until fully coated. Gently tap off any excess coating and place the dipped truffles back onto a clean sheet of parchment paper.
- Step 7: Act fast! As soon as you place each dipped truffle down, immediately press one large candy eye onto the front. Then, sprinkle the top generously with your color-matching sprinkles.
- Step 8: Once all your truffles are dipped and decorated, place them back in the refrigerator for at least another 30 minutes, or until that candy coating has completely hardened.