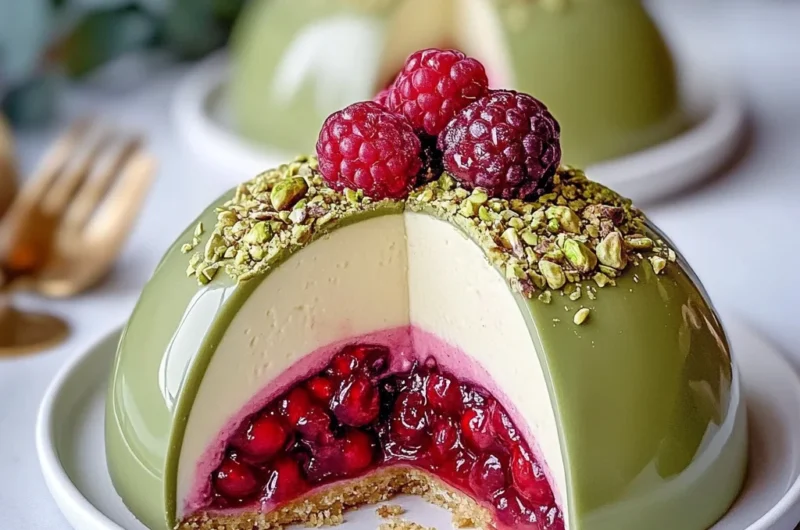
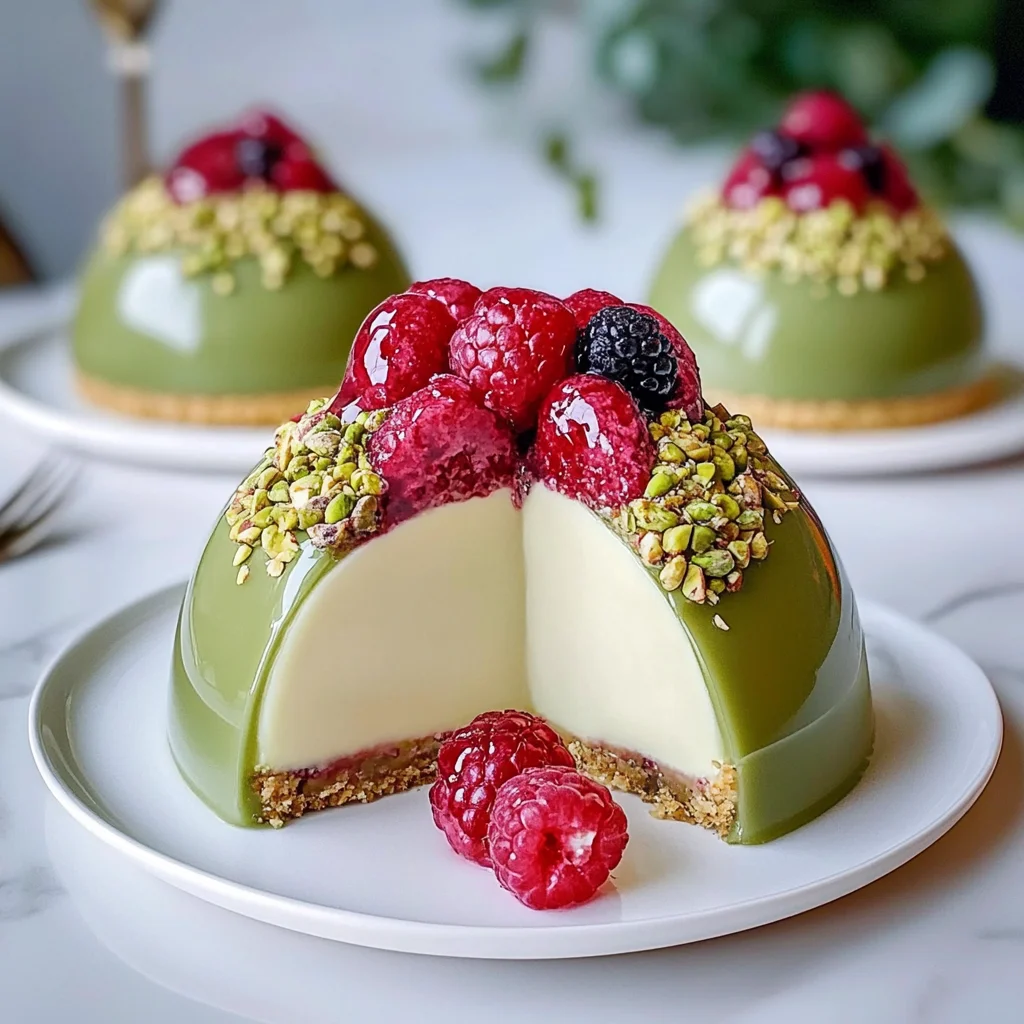
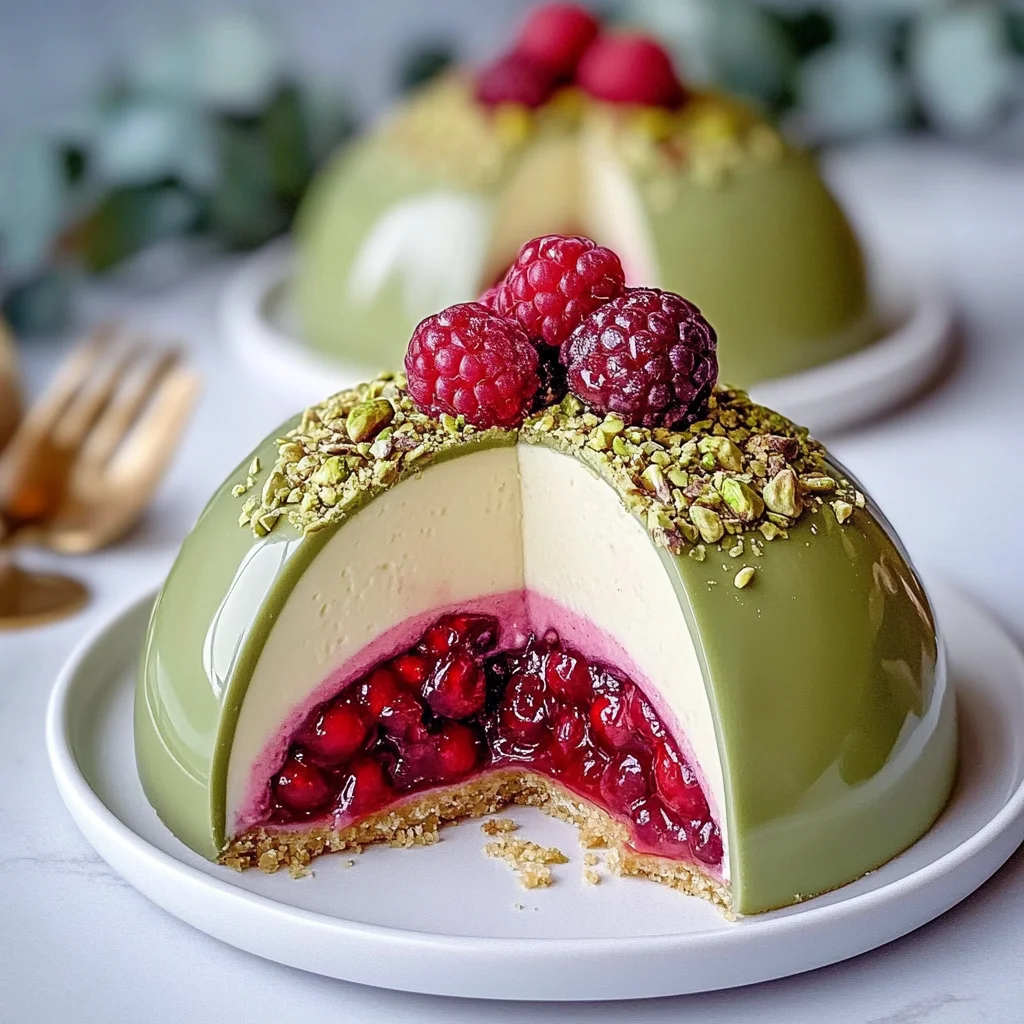
There’s something truly magical about desserts that feel both elegant and approachable, don’t you think? Pistachio Cheesecake Domes with Raspberry Surprise remind me of cozy celebrations with loved ones—a little bite of luxury that’s surprisingly easy to make at home. These domes are like tiny works of art, bursting with creamy pistachio cheesecake and a hidden raspberry center that adds a bright, tangy twist. I love how this recipe combines textures and flavors in such a fun way, perfect for impressing guests or treating yourself on a quiet evening.
What’s even better? You don’t need to be a seasoned baker to whip these up. The no-bake cheesecake layer and the frozen raspberry surprise make this a perfect project for anyone looking to elevate their dessert game without turning on the oven. Plus, the glossy green mirror glaze adds a stunning finish that’s sure to make these domes the star of any dessert table. Let me walk you through every step, share some handy tips, and even suggest creative tweaks so you can make these your own.
Why You’ll Love Pistachio Cheesecake Domes with Raspberry Surprise
- Fast: While these domes take some time to set, the hands-on prep is straightforward and quick.
- Easy: No complicated baking skills needed—just a bit of patience and love.
- Giftable: Their beautiful appearance makes them perfect homemade gifts for friends and family.
- Crowd-pleasing: The unique combo of pistachio and raspberry appeals to sophisticated and sweet tooth palates alike.
Ingredients
To make these Pistachio Cheesecake Domes with Raspberry Surprise, you’ll need a handful of simple yet special ingredients. Here’s a quick rundown with some notes on why they’re important:
- Digestive or graham crackers (100g): The base of your crust, these give a lovely crunch and buttery flavor that pairs perfectly with cheesecake.
- Unsalted butter (50g): Melted to bind the crust together—unsalted lets you control the saltiness.
- Frozen raspberries (150g): Freshness in a frozen form, perfect for that vibrant raspberry center that surprises you with every bite.
- Sugar (various amounts): Balances tartness and sweetness throughout the recipe, from the raspberry filling to the glaze.
- Lemon juice (1 tsp): Adds brightness and enhances the raspberry flavor.
- Cornstarch (1 tbsp): Thickens the raspberry filling so it holds its shape in the domes.
- Cream cheese (250g): The star of the cheesecake layer—make sure it’s softened to avoid lumps.
- Heavy cream (200ml): Whipped to soft peaks, it gives the cheesecake a light, airy texture.
- White chocolate (220g total, divided): Melted into the cheesecake and used in the mirror glaze for sweetness and a silky finish.
- Powdered sugar (50g): Smooth sweetness that blends well with cream cheese.
- Vanilla extract (1 tsp): Adds warmth and depth to the cheesecake flavor.
- Gelatin (10g total, divided): Essential for setting both the cheesecake layer and the glaze, ensuring your domes hold their shape beautifully.
- Condensed milk (100ml): In the mirror glaze, it adds richness and shine.
- Water (various amounts): Used for blooming gelatin and in the glaze.
- Green gel food coloring: Gives the glaze that vibrant pistachio-inspired hue.
- Pistachios (40g): Finely chopped for a crunchy topping that highlights the nutty flavor.
- Fresh raspberries (6): For garnish—adds a fresh and colorful finish.
How to Make Pistachio Cheesecake Domes with Raspberry Surprise
Let’s dive into making these gorgeous domes. I promise, you’ll feel so accomplished when you see these beauties come together!
Step 1: Prepare the Raspberry Center
This hidden surprise is what makes these domes unforgettable. Start by combining your frozen raspberries, sugar, and lemon juice in a small saucepan over medium heat. Stir gently—you want the raspberries to break down slowly and release their juices without turning into a jam. Once it’s bubbling softly, mix your cornstarch with water to create a slurry. This will thicken your raspberry filling just right. Add the slurry to your pan and cook for another 1 to 2 minutes, stirring carefully until thickened.
Once thick, pour the raspberry mixture into silicone dome molds or small half-sphere molds. Pop these into the freezer until completely solid—this usually takes a few hours or overnight if you want to prep ahead.
Step 2: Make the Crust
While your raspberry centers are freezing, crush your digestive or graham crackers finely. I like to toss them in a sealed bag and use a rolling pin for a rustic, even crush. Mix the crumbs with the melted butter until you get an even, sandy texture. Press this mixture firmly into the base of your dome molds. This crust acts as a sturdy, buttery foundation for your cheesecake layer. Chill the crust in the fridge to set while you move on.
Step 3: Bloom the Gelatin for the Cheesecake Layer
Gelatin is the key to getting that perfect creamy but firm texture. Sprinkle gelatin over 2 tablespoons of water and let it sit for 5 minutes to bloom—this softens the gelatin granules and prepares them to dissolve smoothly.
Step 4: Make the Cheesecake Mixture
In a mixing bowl, beat your softened cream cheese with powdered sugar and vanilla extract until smooth and creamy. This step is so satisfying—no lumps here! Gently fold in the melted white chocolate, which adds sweetness and richness to your cheesecake filling.
Next, warm your bloomed gelatin just until it dissolves completely (you can do this in the microwave for about 10 seconds or over a double boiler). Carefully stir this into the cream cheese mixture to incorporate evenly.
Step 5: Whip the Cream and Combine
Whip the heavy cream to soft peaks—this means when you lift your whisk, the cream holds a gentle peak but isn’t stiff. Folding whipped cream into the cheesecake base lightens it beautifully, creating that melt-in-your-mouth texture.
Fill your molds halfway with the cheesecake mixture, then gently press in the frozen raspberry centers. Cover the raspberry with more cheesecake mixture to seal it completely. Freeze these domes overnight or until firm so they hold their shape perfectly.
Step 6: Prepare the Mirror Glaze
This step is where your domes transform into showstoppers. Bloom the gelatin again by sprinkling it over 2 tablespoons of water and letting it sit for 5 minutes. In a saucepan, combine water, sugar, and condensed milk. Heat over medium until steaming and sugar dissolves completely—do not boil.
Pour this hot mixture over the finely chopped white chocolate. Let it sit for a minute, then add the gelatin and blend with an immersion blender or whisk until silky smooth and glossy. Add green gel food coloring drop by drop until you get that perfect pistachio shade.
Cool the glaze to about 32–34°C (90–93°F), which is the ideal temperature for pouring over frozen domes without melting them.
Step 7: Glaze and Garnish
Place your frozen cheesecake domes on a wire rack over a baking tray to catch excess glaze. Pour the mirror glaze evenly over each dome, letting it drip down the sides for a flawless finish. Garnish with finely chopped pistachios and fresh raspberries for a pop of color and extra texture. Chill the domes in the fridge until ready to serve.
Substitutions & Additions
Feel free to personalize these domes according to your taste or what’s on hand. Here are some ideas I’ve tried or thought of:
- Crust: Swap graham crackers for crushed amaretti cookies or even ground almonds for a gluten-free option.
- Raspberry center: Try other berries like blueberries or blackberries for a different fruity surprise.
- Cheesecake layer: If you want a more pronounced pistachio flavor, add 1–2 tablespoons of pistachio paste or finely ground pistachios to the cheesecake mixture.
- Mirror glaze: You can experiment with other colors—light pink for strawberry domes or a soft yellow for lemon—just swap out the green gel food coloring.
- Toppings: Toasted coconut flakes or edible flowers make a stunning alternative garnish.
Tips for Success
- Gelatin blooming: Don’t skip blooming gelatin—it’s essential for smooth incorporation without lumps.
- Cheesecake texture: Make sure your cream cheese is fully softened at room temperature before mixing to avoid clumps.
- Whipping cream: Keep an eye on your heavy cream while whipping; soft peaks are key for the perfect light texture.
- Freezing time: Be patient! The raspberry centers and domes need to be fully frozen before moving on to glazing to prevent melting or distortion.
- Mirror glaze temperature: Use a thermometer to check the glaze temperature before pouring. Too hot, and it will melt your domes; too cold, and it won’t spread smoothly.
- Prep ahead: You can prepare the raspberry centers and crust a day or two in advance. The domes themselves can be frozen for up to a week, making this a great recipe for entertaining.
How to Store Pistachio Cheesecake Domes with Raspberry Surprise
Because these domes contain fresh cream and gelatin, refrigeration is a must. Keep them in an airtight container in the fridge for up to 3 days. If you want to store them longer, freezing is your best bet. Wrap each dome individually in plastic wrap and place in a sealed container or freezer bag. They’ll keep well in the freezer for up to a week.
When you’re ready to serve after freezing, thaw them in the refrigerator for several hours or overnight to keep their perfect texture. Avoid leaving them out at room temperature for too long, as the glaze and cream cheese can soften quickly.
FAQs
Can I use fresh raspberries instead of frozen?
Yes! Fresh raspberries work well for the center. Just cook them gently as instructed, but keep in mind frozen raspberries tend to break down more easily, which helps with the texture.
What if I don’t have silicone dome molds?
You can use muffin tins lined with plastic wrap or small half-sphere molds. Just make sure they’re flexible enough to pop the frozen raspberry centers out without breaking.
Can I make this recipe dairy-free?
With some substitutions, yes! Use dairy-free cream cheese, coconut cream instead of heavy cream, and dairy-free white chocolate. The gelatin can be replaced with agar-agar, but note the texture may differ slightly.
How do I get the perfect mirror glaze shine?
Patience and temperature control are key. Make sure the glaze is well blended and at the right temperature (32–34°C) before pouring over fully frozen domes. Avoid stirring too much after adding gelatin to prevent bubbles.
If you’re interested in more delicious no-bake desserts, you might enjoy the No-Bake Tiramisu Domes—they also feature a luscious creamy texture and elegant presentation. And if you want a cozy meal to pair after your dessert, the Cozy Creamy Tortellini Soup is a comforting option full of warmth and flavor.
Finally, if you want to explore more creative treats, check out the fun Oreo Eyeball Truffles for a spooky twist on classic truffles that are perfect for Halloween or any quirky gathering.
Thanks so much for stopping by, and I hope these Pistachio Cheesecake Domes with Raspberry Surprise bring a little sparkle to your kitchen and your celebrations. Happy cooking!
Don’t forget to follow us on Pinterest for more delicious recipes and cooking inspiration.
Pistachio Cheesecake Domes with Raspberry Surprise
Ingredients
Equipment
Method
- Step 1: Prepare the raspberry center by heating frozen raspberries, sugar, and lemon juice in a small saucepan over medium heat. Stir gently until raspberries break down but do not turn to jam. Mix cornstarch with water to make a slurry, add to the pan, and cook for 1–2 minutes until thickened. Pour into silicone dome molds and freeze until solid.
- Step 2: Crush digestive or graham crackers finely. Mix crumbs with melted unsalted butter until evenly combined. Press mixture firmly into the base of dome molds. Chill in the fridge to set.
- Step 3: Bloom half the gelatin by sprinkling over 2 tablespoons of water; let sit for 5 minutes.
- Step 4: Beat softened cream cheese with powdered sugar and vanilla extract until smooth. Fold in melted white chocolate. Warm bloomed gelatin gently until dissolved and stir into the cream cheese mixture.
- Step 5: Whip heavy cream to soft peaks, then fold gently into the cheesecake mixture. Fill dome molds halfway with cheesecake mixture, press frozen raspberry centers in, then cover completely with more cheesecake mixture. Freeze overnight or until firm.
- Step 6: Bloom remaining gelatin over 2 tablespoons of water for 5 minutes. Heat water, sugar, and condensed milk in a saucepan until steaming and sugar dissolves (do not boil). Pour hot mixture over finely chopped white chocolate and let sit 1 minute. Add gelatin, then blend with immersion blender or whisk until smooth and glossy. Add green gel food coloring drop by drop to desired pistachio color. Cool glaze to 32–34°C.
- Step 7: Place frozen cheesecake domes on a wire rack over a baking tray. Pour mirror glaze evenly over each dome, allowing excess to drip off. Garnish with finely chopped pistachios and fresh raspberries. Chill domes in the fridge until ready to serve.