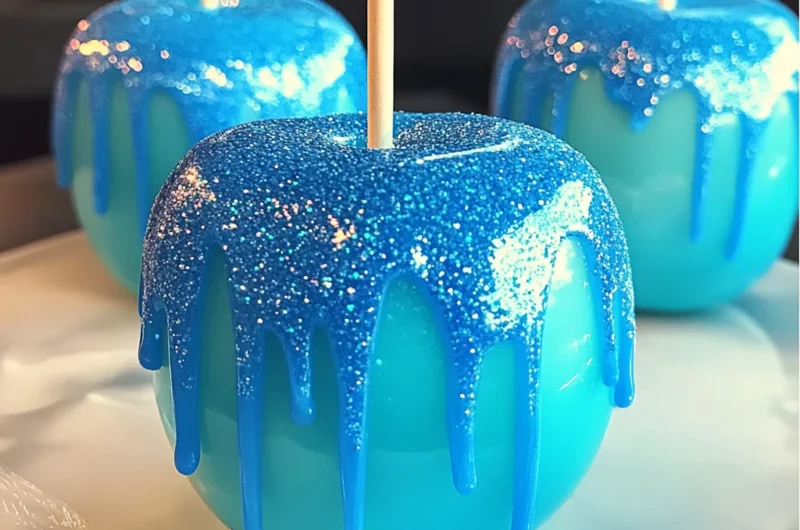
Oh, friend, do you ever get that craving for a treat that’s not just delicious, but also brings a huge smile to your face? For me, that often means a trip down memory lane to those vibrant, glossy candy apples at the fair! There’s something so wonderfully nostalgic about them, isn’t there? But what if I told you we could take that classic joy and give it a magical, enchanting twist? Get ready to make a splash with these incredible Sweet Ocean Candy Apples!
These aren’t just any candy apples; they’re a little piece of edible art, perfect for gifting, parties, or simply treating yourself to something truly special. And the best part? They look super impressive, but they’re surprisingly easy and quick to whip up right in your own kitchen. Seriously, you’ll be amazed at how simple it is to create these shimmering, blue beauties. Let’s make some magic!
Why You’ll Love Sweet Ocean Candy Apples
- Fast: Quick prep and cook time, so you’re enjoying them sooner!
- Easy: No complicated steps, just simple candy making.
- Giftable: They make the most stunning, unique homemade gifts.
- Crowd-pleasing: Kids and adults alike will be enchanted by their look and taste.
Ingredients
Gathering your ingredients is the first fun step towards making these gorgeous treats. Here’s what you’ll need:
- 6 medium apples (Granny Smith or Honeycrisp recommended): I adore Granny Smiths for their tartness – it’s a perfect contrast to the sweet candy coating! Honeycrisps are also fantastic if you prefer a sweeter, crisper apple. Make sure they’re firm!
- 6 lollipop sticks or wooden skewers: Essential for holding your beautiful creations. You can find these at most craft or grocery stores.
- 400 g (2 cups) granulated sugar: The foundation of our sweet, crunchy candy coating.
- 120 ml (½ cup) light corn syrup (or glucose syrup): This is your secret weapon for that perfect glossy, non-crystallized finish. Don’t skip it!
- 120 ml (½ cup) water: Simple H2O, helps dissolve the sugar.
- ½ tsp blue gel food coloring: Gel is key here, my friend. It gives you a vibrant, deep blue color without adding too much liquid, unlike liquid food coloring.
- Edible blue glitter (optional): Oh, this is where the “ocean magic” truly comes alive! A little sparkle makes all the difference.
- 1 tsp vanilla extract (optional): A lovely warmth and depth of flavor. If you want to keep the flavor purely sweet, you can omit it, but I find it adds a little something extra.
How to Make Sweet Ocean Candy Apples
Alright, let’s get those hands a little sticky and create some edible masterpieces! Just follow these steps, and you’ll be a candy apple pro in no time.
- First things first, you’ll want to give your apples a good wash. Then, and this is super important for the candy to stick properly, dry them completely. Seriously, no moisture allowed! Once they’re sparkling clean and dry, carefully insert a lollipop stick or wooden skewer firmly into the top of each apple. Make sure it’s secure! Then, set them aside on a parchment-lined baking sheet. This parchment paper is your best friend for easy cleanup later.
- Now, grab a heavy-bottom saucepan. This is important because it distributes heat evenly and helps prevent burning. Combine your granulated sugar, corn syrup, and water in the pan. Place it over medium-high heat. Here’s a crucial tip: resist the urge to stir! We want the sugar to dissolve without crystallizing.
- Keep that mixture boiling gently, still no stirring! You’ll need a candy thermometer for this next part, it’s absolutely essential for perfect candy apples. Continue to boil until the mixture reaches exactly 150°C (300°F). This is known as the “hard crack stage,” and it’s what gives your candy apples that satisfying, crunchy bite. Trust your thermometer here!
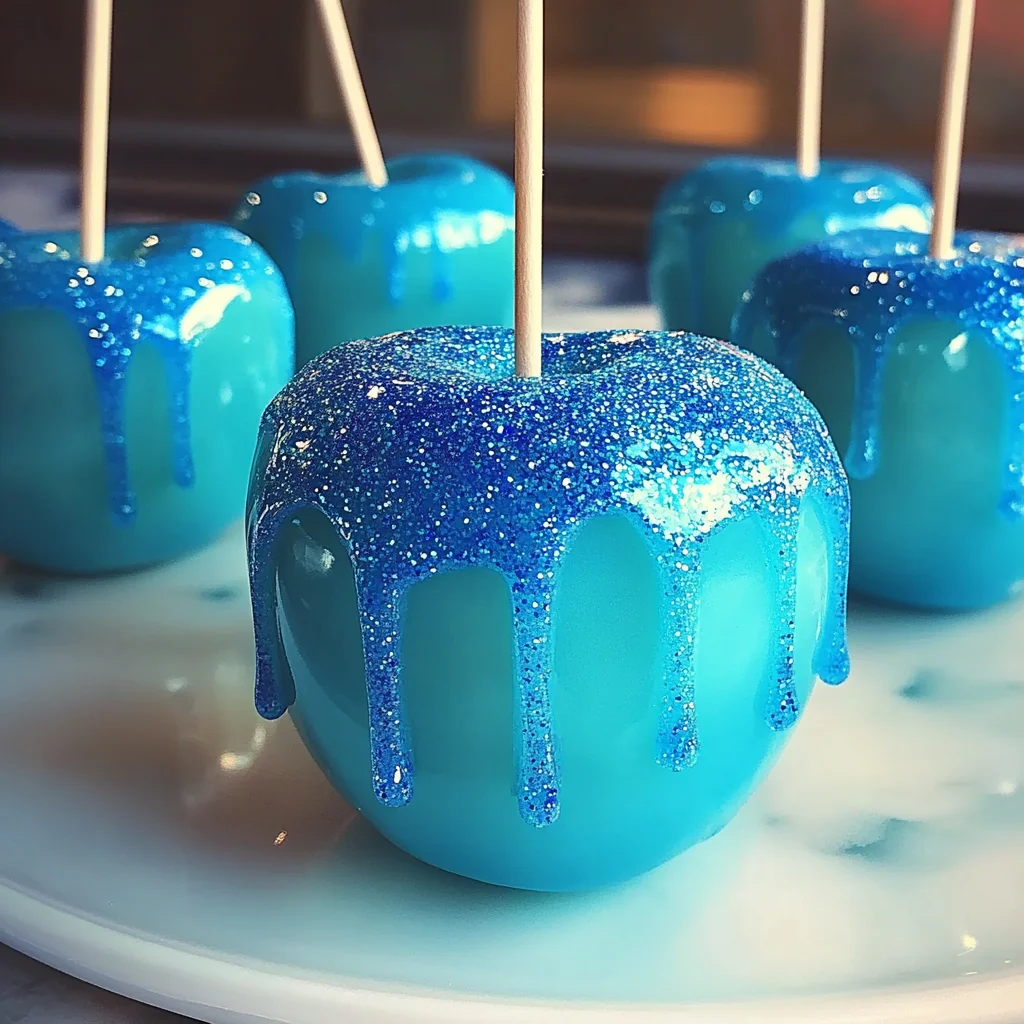
- As soon as your candy reaches 150°C (300°F), remove the saucepan from the heat immediately. Swiftly stir in your blue gel food coloring, the vanilla extract (if you’re using it), and a little pinch of that fabulous edible blue glitter. Stir just enough to combine everything evenly and get that gorgeous ocean hue.
- Time for the dipping! Carefully tilt your pan slightly. Take one apple by its stick and dip it into the candy mixture. Twirl it around gently to ensure it gets a beautiful, even coating all over. Lift the apple and let any excess candy drip back into the pan. You want a nice, smooth layer, not a thick, gloopy one.
- Place your perfectly coated apples onto your parchment-lined baking sheet to set. Don’t let them touch each other, or they’ll stick!
- If you’re feeling extra fancy and want more sparkle, now’s the time! While the candy coating is still a little sticky, sprinkle additional edible glitter over your apples. It really makes them pop!
- Finally, the hardest part: patience! Allow your stunning candy apples to cool completely before you take that first glorious bite. This can take anywhere from 30 minutes to an hour.
Substitutions & Additions
One of the joys of cooking is making a recipe your own! Here are some ideas to get your creative juices flowing:
- Apple Varieties: While Granny Smith and Honeycrisp are my go-tos, feel free to experiment! Gala or Fuji apples work well too, just make sure they’re firm and not too soft.
- Color Fun: Instead of blue, why not try red for a classic look, green for a whimsical vibe, or even purple for a magical forest theme? Just swap out the blue gel food coloring for your color of choice.
- Flavor Boost: Beyond vanilla, a few drops of almond extract, peppermint extract (for a winter wonderland!), or even a fruit-flavored oil could add a whole new dimension.
- Topping Extravaganza: While still slightly sticky, roll or sprinkle your apples with all sorts of goodies! Think crushed graham crackers for a sandy beach look, finely chopped nuts, rainbow sprinkles, or even a drizzle of melted white chocolate. If you’re looking for another delightful no-bake treat that’s just as simple and satisfying, you absolutely have to check out our easy no-bake Martha Washington Candy – it’s a guaranteed hit!
- Edible Decorations: Little edible sugar pearls or tiny candy seashells could elevate your ocean theme even further!
Tips for Success
Candy making can seem intimidating, but with a few pointers, you’ll nail it every time:
- The Candy Thermometer is Non-Negotiable: I cannot stress this enough! Guessing the temperature often leads to sticky, soft, or burnt candy. Invest in a good candy thermometer; it’s truly worth it.
- Dry Apples, Dry Apples, Dry Apples: I know I said it before, but seriously, any moisture on the apple will prevent the candy from sticking properly and result in a bubbly, uneven coating. Give them a good scrub and dry them meticulously.
- Don’t Stir the Syrup: Once the sugar, water, and corn syrup are boiling, resist the urge to stir. Stirring can cause sugar crystals to form, leading to a grainy texture instead of a smooth, glossy one.
- Work Quickly: Once the candy comes off the heat and you add the coloring, it starts to cool and thicken quickly. Have your apples ready and dip them efficiently.
- Safety First: Hot sugar is extremely hot and can cause severe burns. Be incredibly careful when working with the molten candy mixture. Keep children and pets away from the stovetop.
- Humidity Check: Candy making is best done on a dry day. High humidity can make your candy apples sticky even after they’ve set.
- Prep Ahead: You can wash and skewer your apples a day in advance. Store them in the fridge until you’re ready to dip. For another stunning dessert that’s sure to impress without too much fuss, don’t miss our easy chocolate pound cake with fudge frosting – it’s a showstopper!
How to Store Sweet Ocean Candy Apples
Once your beautiful Sweet Ocean Candy Apples have fully cooled and set, you’ll want to store them properly to maintain their crisp, glorious coating.
The best way to store them is individually wrapped in cellophane bags or parchment paper, then placed in an airtight container at room temperature. This helps protect them from humidity, which can make the candy coating sticky. They’ll generally stay fresh and delicious for about 2-3 days. While you can refrigerate them, I find the cold can sometimes make the candy coating soften a bit or become cloudy due to condensation when brought back to room temperature. Enjoy them sooner rather than later for the best experience!
FAQs
Got a few more questions buzzing around? Let’s tackle them!
Q: My candy apples turned out sticky. What went wrong?
A: Most likely, the candy didn’t reach the full 150°C (300°F) hard crack stage, or there was too much humidity in the air. A candy thermometer is crucial for hitting the right temperature, and try to make them on a dry day!
Q: Can I use liquid food coloring instead of gel?
A: I really recommend gel food coloring. Liquid food coloring adds more water to your candy mixture, which can throw off the consistency and make it harder to reach the proper temperature, potentially leading to a sticky result. Gel gives you vibrant color without the extra liquid.
Q: What if I don’t have a candy thermometer?
A: While it’s extremely difficult to get perfect candy without one, a “cold water test” can give you a rough idea. Drop a small amount of the boiling syrup into a cup of very cold water. If it forms brittle threads that snap when bent, it’s at the hard crack stage. However, I truly encourage you to get a thermometer for consistent results!
Q: Can I use different fruits?
A: Yes, you can! Pears or even large grapes could work, but be aware that different fruits have different moisture levels and textures, so the coating might not adhere exactly the same way. Apples are ideal because of their firm texture and skin. And if you’re planning a full themed party, you might also love whipping up our vibrant Easy Hocus Pocus Punch to complete the festive spread!
I hope you have the best time making these enchanting Sweet Ocean Candy Apples! They’re truly a joy to create and an even bigger joy to eat. Happy dipping!
For more delicious recipes and kitchen inspiration, follow us on Pinterest!