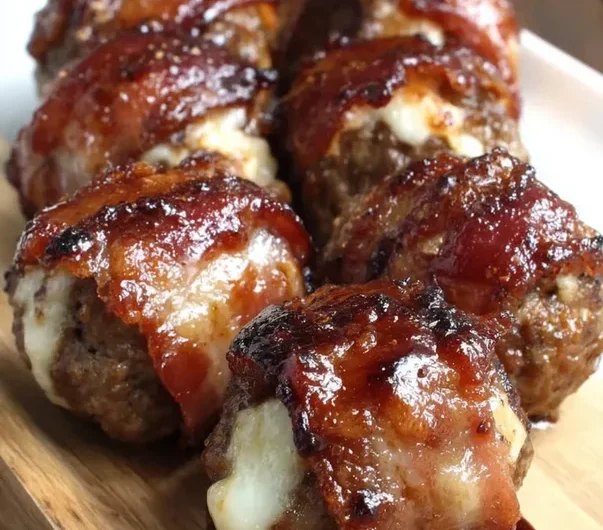
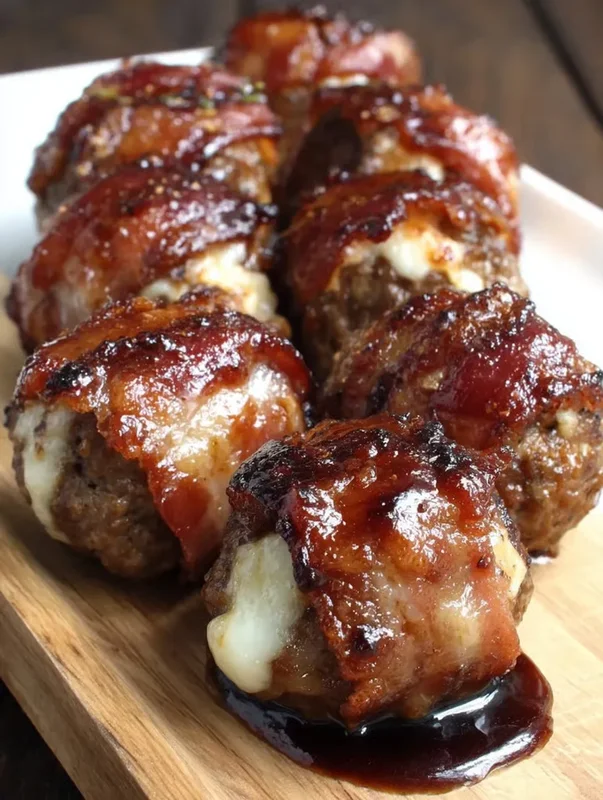
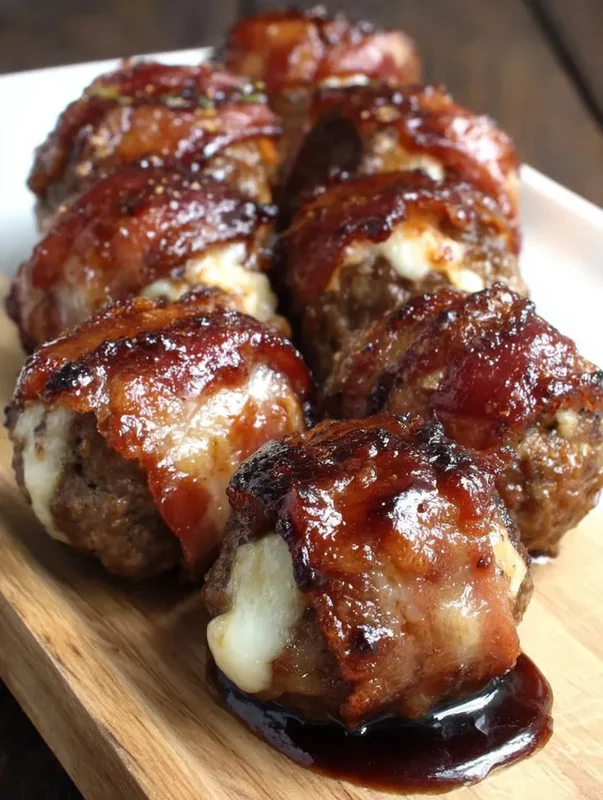
Oh honey, do I have a treat for you today! Remember those glorious summer cookouts, the smell of barbecue wafting through the air, and plates piled high with all the good stuff? Well, I’m bringing that nostalgic, mouth-watering experience right into your kitchen with a recipe that’s so simple, so quick, and so utterly delicious, it’s practically magic. We’re talking about Cheddar-Stuffed BBQ Bacon Bombs, and trust me, these little bundles of joy are about to become your new go-to for pretty much any occasion. Imagine juicy seasoned ground beef, a melty pocket of sharp cheddar, all wrapped in crispy, savory bacon, and brushed with a tangy BBQ glaze. It’s like a party in every bite, and it’s surprisingly easy to achieve. Get ready to impress everyone (including yourself!) with these memorable bites!
Why You’ll Love Cheddar-Stuffed BBQ Bacon Bombs
- Fast: From mixing bowl to oven in minutes, these are perfect for busy weeknights or last-minute gatherings.
- Easy: No complicated techniques here! Just simple mixing, stuffing, and wrapping.
- Giftable: (Though you might not want to share!) These make a fantastic potluck contribution or a thoughtful homemade food gift.
- Crowd-pleasing: Seriously, who can resist bacon, cheese, and BBQ? These are always the first to disappear. If you love these savory bites, you might also adore our Garlic Parmesan Cheeseburger Bombs for another flavor explosion!
Ingredients
Gather your simple cast of characters for this flavor adventure!
- 1 pound ground beef: This is your hearty base. I usually go for 80/20 for the best flavor and juiciness, but leaner works too!
- 1/2 cup breadcrumbs: Our little secret binder that helps keep everything tender and moist. Plain or seasoned, whichever you have on hand.
- 1 large egg: The ultimate helper, ensuring all those delicious flavors stay together.
- 1 teaspoon salt: A must-have to bring out all the savory goodness.
- 1/2 teaspoon black pepper: Just enough warmth and zing.
- 1/2 teaspoon garlic powder: Because, let’s be real, almost everything is better with garlic!
- 1/2 teaspoon onion powder: Adds that subtle, foundational savory note that makes a huge difference.
- 1/2 cup shredded cheddar cheese: The gooey, melty heart of our bombs! Sharp cheddar offers the best flavor pop, but mild is fine too.
- 8 slices beef bacon: The crispy, smoky hug that holds it all together and adds an incredible layer of flavor. If you prefer pork bacon, that works beautifully too!
- 1/4 cup barbecue sauce: The glorious glaze that adds that irresistible sticky, sweet, and tangy finish. Use your favorite kind!
How to Make Cheddar-Stuffed BBQ Bacon Bombs
Alright, let’s get cooking! You’ll be amazed at how quickly these come together.
- First things first: Preheat your oven. You’ll want to get it nice and cozy at 375°F (190°C). While it’s heating up, go ahead and line a baking sheet with parchment paper. This makes for super easy cleanup later – trust me on this one!
- Time to get your hands a little messy! In a large mixing bowl, combine your ground beef, breadcrumbs, the egg, salt, black pepper, garlic powder, and onion powder. Now, dive in with your hands and mix everything until it’s just integrated. Be gentle; you don’t want to overmix, or your bombs might turn out a little tough.
- Let’s make some “bombs”! Divide your seasoned meat mixture into eight equal portions. Think of them like little mini burger patties. Flatten each portion gently in the palm of your hand, then place a spoonful of shredded cheddar cheese right in the center. Now, carefully gather the meat around the cheese and shape it into a neat ball, making sure that melty cheddar is completely sealed inside. This is key to preventing a cheesy escape!
- Wrap it up in bacon! Take one slice of beef bacon and carefully wrap it around each cheese-stuffed meatball. You want it snug! Tuck the ends of the bacon underneath the ball to help secure it in place during baking.
- Ready for the oven! Arrange your bacon-wrapped bombs onto your prepared parchment-lined baking sheet. Make sure they have a little space between them so they can crisp up nicely.
- The glorious glaze! Grab your favorite barbecue sauce and, using a pastry brush, coat each bomb evenly. This is where that signature BBQ flavor really shines through!
- Into the oven they go! Bake for 25–30 minutes. You’re looking for that bacon to be wonderfully crisp and the internal temperature of the beef to reach a safe 160°F (71°C). A meat thermometer is your best friend here!
- Serve hot and devour! Once they’re golden brown and sizzling, pull them out of the oven. These are definitely best enjoyed fresh and hot, so gather your crew and dig in!
Substitutions & Additions
Feeling creative? Here are some ways to switch things up and make these bombs uniquely yours!
- Cheese Swap: Not a cheddar fan? Try pepper jack for a little kick, mozzarella for a super gooey pull, or even a smoked gouda for a sophisticated twist.
- Meat Makeover: Ground turkey or chicken can absolutely be used instead of beef for a leaner option. Just be mindful that they might need a touch less cooking time.
- Bacon Options: If beef bacon isn’t your jam, regular pork bacon works perfectly. Thicker-cut bacon will give you a chewier texture, while thin-cut will be extra crispy.
- BBQ Sauce Flair: Experiment with different BBQ sauces! A honey BBQ will add sweetness, a spicy chipotle BBQ will bring the heat, or even a homemade sauce for a personal touch.
- Spice it Up: Mix in a pinch of smoked paprika, a dash of cayenne pepper, or a teaspoon of your favorite dried herbs like oregano or thyme into the beef mixture.
- Veggies Welcome: Finely minced onion, bell pepper, or jalapeño can be added to the ground beef mixture for extra flavor and texture. Just make sure they’re super fine so they don’t prevent the balls from holding shape.
- Serving Style: For an easy appetizer, you can stick a toothpick in each one. For a heartier meal, serve them on slider buns with a dollop of extra BBQ sauce and maybe some pickles! If you’re a fan of other hearty, meaty goodness, you’ll definitely want to check out our Easy Sloppy Joe Casserole, another family favorite that delivers big flavor.
Tips for Success
Want to make sure your Cheddar-Stuffed BBQ Bacon Bombs are absolutely perfect every time? Here are my top tips:
- Don’t Overmix the Meat: This is crucial for tender meatballs. Mix just until the ingredients are combined, then stop. Overmixing develops the protein, leading to a tougher texture.
- Seal the Cheese Tightly: Take a moment to really pinch and seal the meat around the cheddar. Any gaps, and your precious cheese might make a run for it during baking!
- Bacon Placement Matters: Wrap the bacon snugly and ensure the seam is underneath the ball. This helps prevent it from unraveling in the oven.
- Parchment Paper is Your Friend: Seriously, don’t skip it! It prevents sticking and makes cleanup a breeze, especially with the caramelized BBQ sauce.
- Give Them Space: Don’t overcrowd your baking sheet. Giving each bomb a little breathing room allows the bacon to get truly crispy and golden.
- Use a Meat Thermometer: For perfectly cooked, safe meat, always check the internal temperature. 160°F (71°C) is your magic number for ground beef.
- Prep Ahead: You can assemble these beauties up to a day in advance, cover them, and store them in the fridge. Just brush with BBQ sauce right before baking. For another fantastic party snack that’s just as easy to whip up, consider making some Easy Cheesy Sausage Balls – they’re always a hit!
How to Store Cheddar-Stuffed BBQ Bacon Bombs
If you happen to have any leftovers (a rare occurrence, I know!), here’s how to keep them fresh:
- Refrigeration: Cooked BBQ Bacon Bombs can be stored in an airtight container in the refrigerator for up to 3-4 days.
- Freezing: You can freeze both cooked and uncooked bombs!
- Uncooked: Assemble them as directed, but don’t bake. Place them on a parchment-lined baking sheet and freeze until solid. Once frozen, transfer them to a freezer-safe bag or container for up to 1 month. Thaw in the fridge overnight before baking, or bake from frozen (this will increase baking time).
- Cooked: Allow them to cool completely, then store them in a freezer-safe container for up to 1 month.
- Reheating: For best results, reheat in the oven or an air fryer at 350°F (175°C) until warmed through and the bacon is crispy again. Microwaving is an option, but the bacon won’t be as crisp.
FAQs
Can I use different types of ground meat for these bombs?
Absolutely! Ground turkey, ground chicken, or even a mix of ground beef and pork would work wonderfully. Just ensure the internal temperature reaches a safe level for whatever meat you choose.
Can I prepare Cheddar-Stuffed BBQ Bacon Bombs ahead of time for a party?
Yes, you definitely can! Assemble the bombs (stuff, wrap, but don’t brush with sauce) and refrigerate them in an airtight container for up to 24 hours. When ready to bake, just take them out, brush with BBQ sauce, and pop them in the oven. You might need an extra minute or two of baking time since they’ll be cold.
What are some good side dishes to serve with these?
These bombs pair perfectly with classic BBQ sides! Think creamy coleslaw, a tangy potato salad, corn on the cob, baked beans, or even a simple green salad to cut through the richness.
Why did the cheese leak out of my bombs?
This usually happens if the meat wasn’t fully sealed around the cheese. Make sure when you form the balls, you really pinch and smooth the meat over all sides of the cheese, leaving no gaps or cracks for it to escape during baking. Don’t overfill with too much cheese either!
For more delicious and easy recipes, be sure to follow us on Pinterest!
Cheddar-Stuffed BBQ Bacon Bombs
Ingredients
Equipment
Method
- Step 1: Preheat your oven to 375°F (190°C) and line a baking sheet with parchment paper for easy cleanup.
- Step 2: In a large mixing bowl, combine ground beef, breadcrumbs, egg, salt, black pepper, garlic powder, and onion powder. Mix gently with your hands until just integrated, being careful not to overmix.
- Step 3: Divide the meat mixture into eight equal portions. Flatten each portion, place a spoonful of shredded cheddar cheese in the center, then carefully gather the meat around the cheese and shape into a neat ball, ensuring the cheese is completely sealed inside.
- Step 4: Wrap one slice of beef bacon snugly around each cheese-stuffed meatball, tucking the ends underneath to secure it.
- Step 5: Arrange the bacon-wrapped bombs onto the prepared parchment-lined baking sheet, leaving some space between them for even crisping.
- Step 6: Using a pastry brush, coat each bomb evenly with your favorite barbecue sauce.
- Step 7: Bake for 25–30 minutes, or until the bacon is wonderfully crisp and the internal temperature of the beef reaches a safe 160°F (71°C) when checked with a meat thermometer.
- Step 8: Remove from the oven and serve hot. These are best enjoyed fresh!